Setting Up an Example Virtual Class
In this example, we will set up a basic ILT Program, which will consist of 2 live streaming sessions (meaning you and/or an instructor will live-stream to one or more trainees).
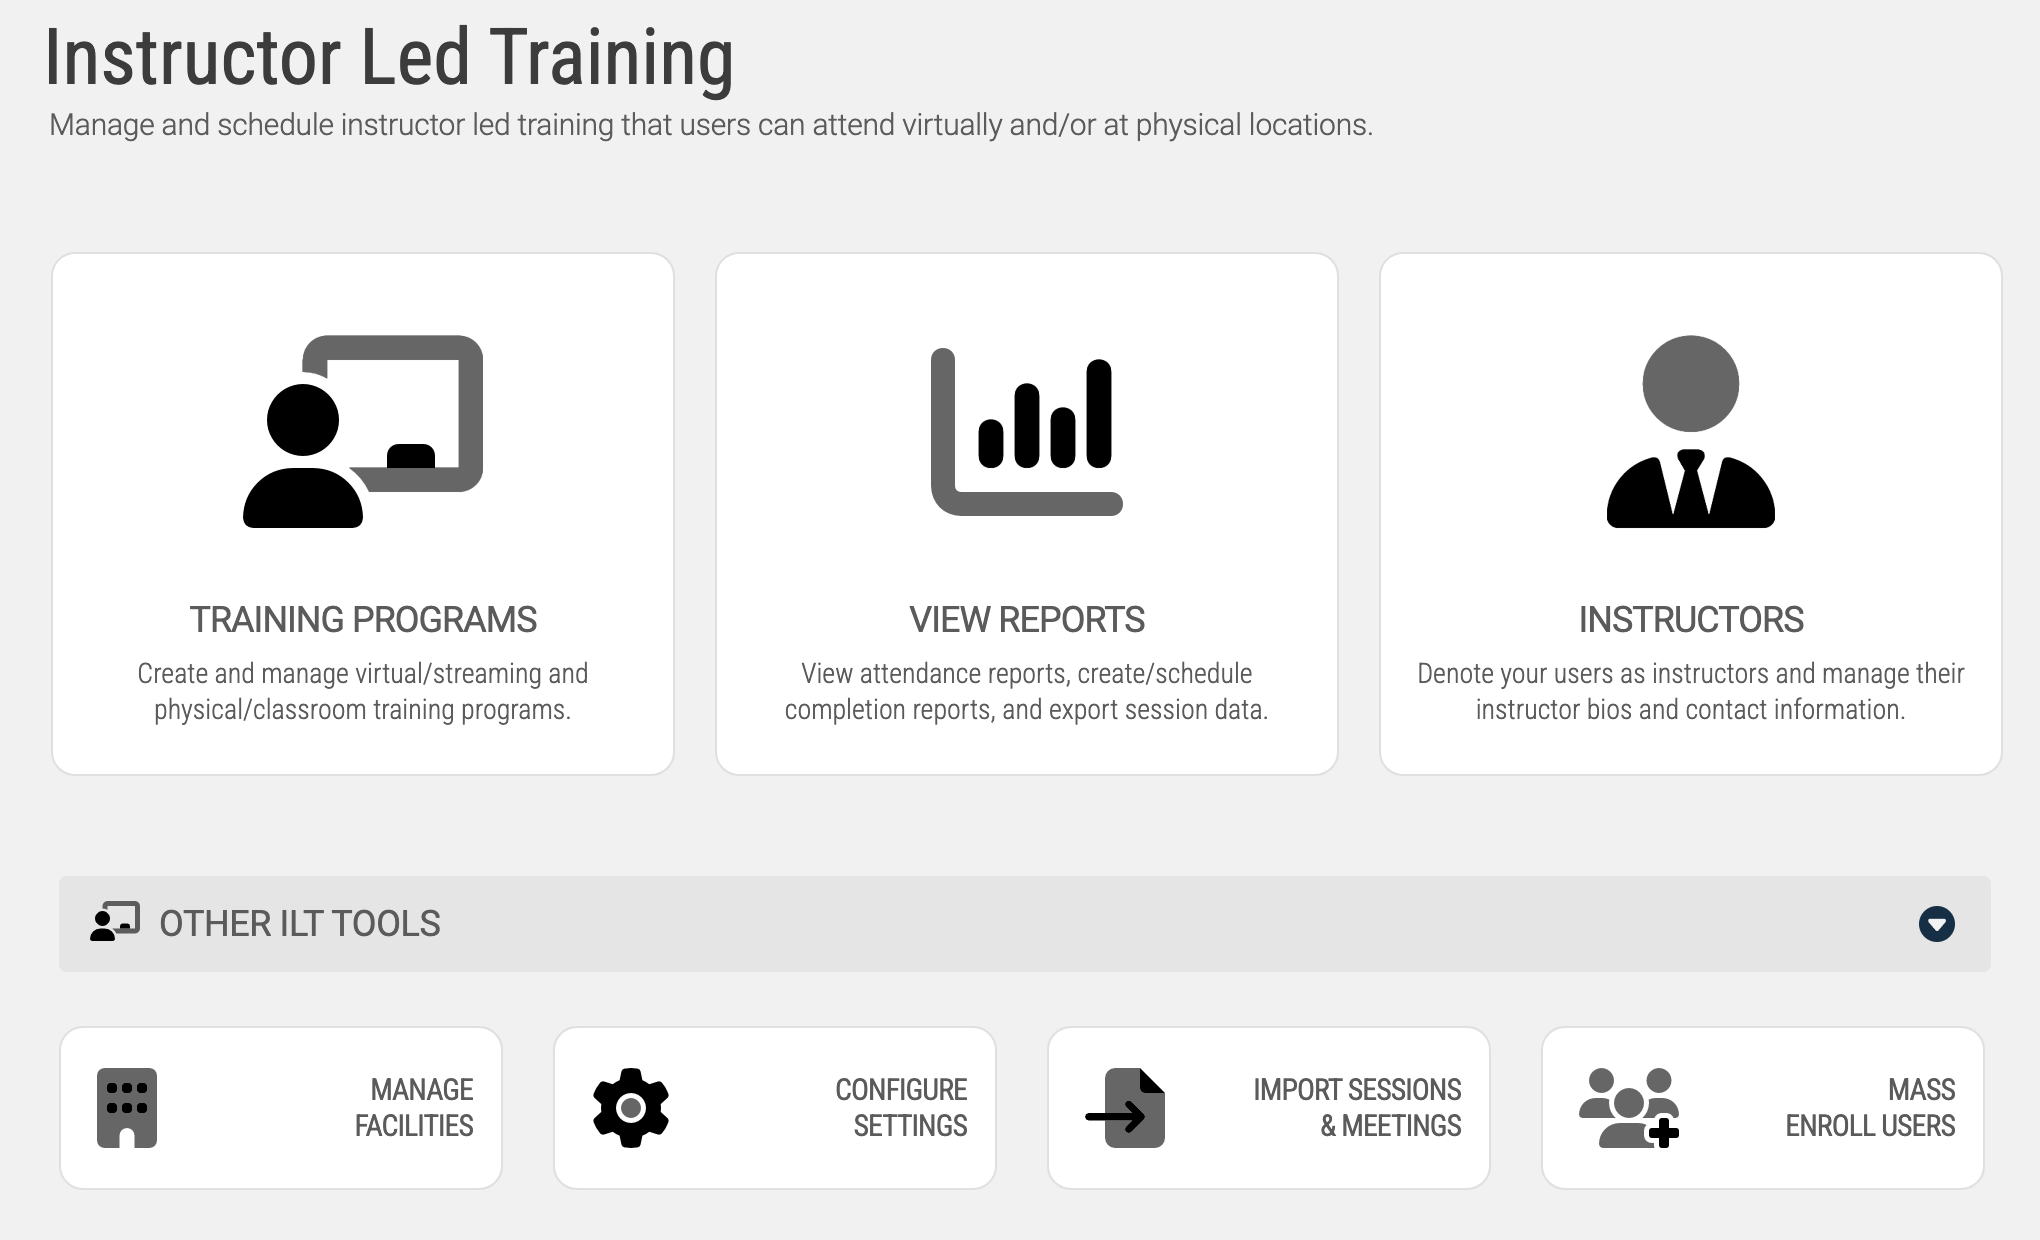
First, enter the ILT module by going to the Learning area, then click the Instructor Led Training tile.
Setup Instructors
We will want to set up at least 1 instructor.
Setting up instructors doesn’t need to be done each time - but as this is the first time we are using this area, we are going to need to designate one or more users as eligible instructors.
So, click on the Instructors tile:
Next, click the button to add an instructor:
You will be prompted to enter a few characters of the instructor’s name. The ‘pool’ of potential instructors is based on the users currently in your LMS system.

Once you have located the user you would like to designate, click on their name to add them as an instructor.
In short, these 2 text areas enable to you set up a small bio (shown on the program session page when users are viewing the information regarding the program itself), and a full bio (available when a user navigates to the instructors full bio page).
Once you have set these up, click the Save Changes button.
Create an ILT Training Program
Now that we have an instructor, we can create a training program - the top-most level of a subject/course (e.g.: Algebra 1).
Click the Dashboard tab, then Training Programs tile.
Click the button to add a new ILT Program, then enter a name for the program in the space provided (Algebra 1).
Add Training Session(s) to the Program
Now we can add one or more sessions. A session is a grouping of days/times (e.g.: Fall Session). It is likely that you will initially create your ILT Programs for all of your subjects, but then just continually add new Training Sessions going forward and rarely add new ILT Programs after they are initially set up.
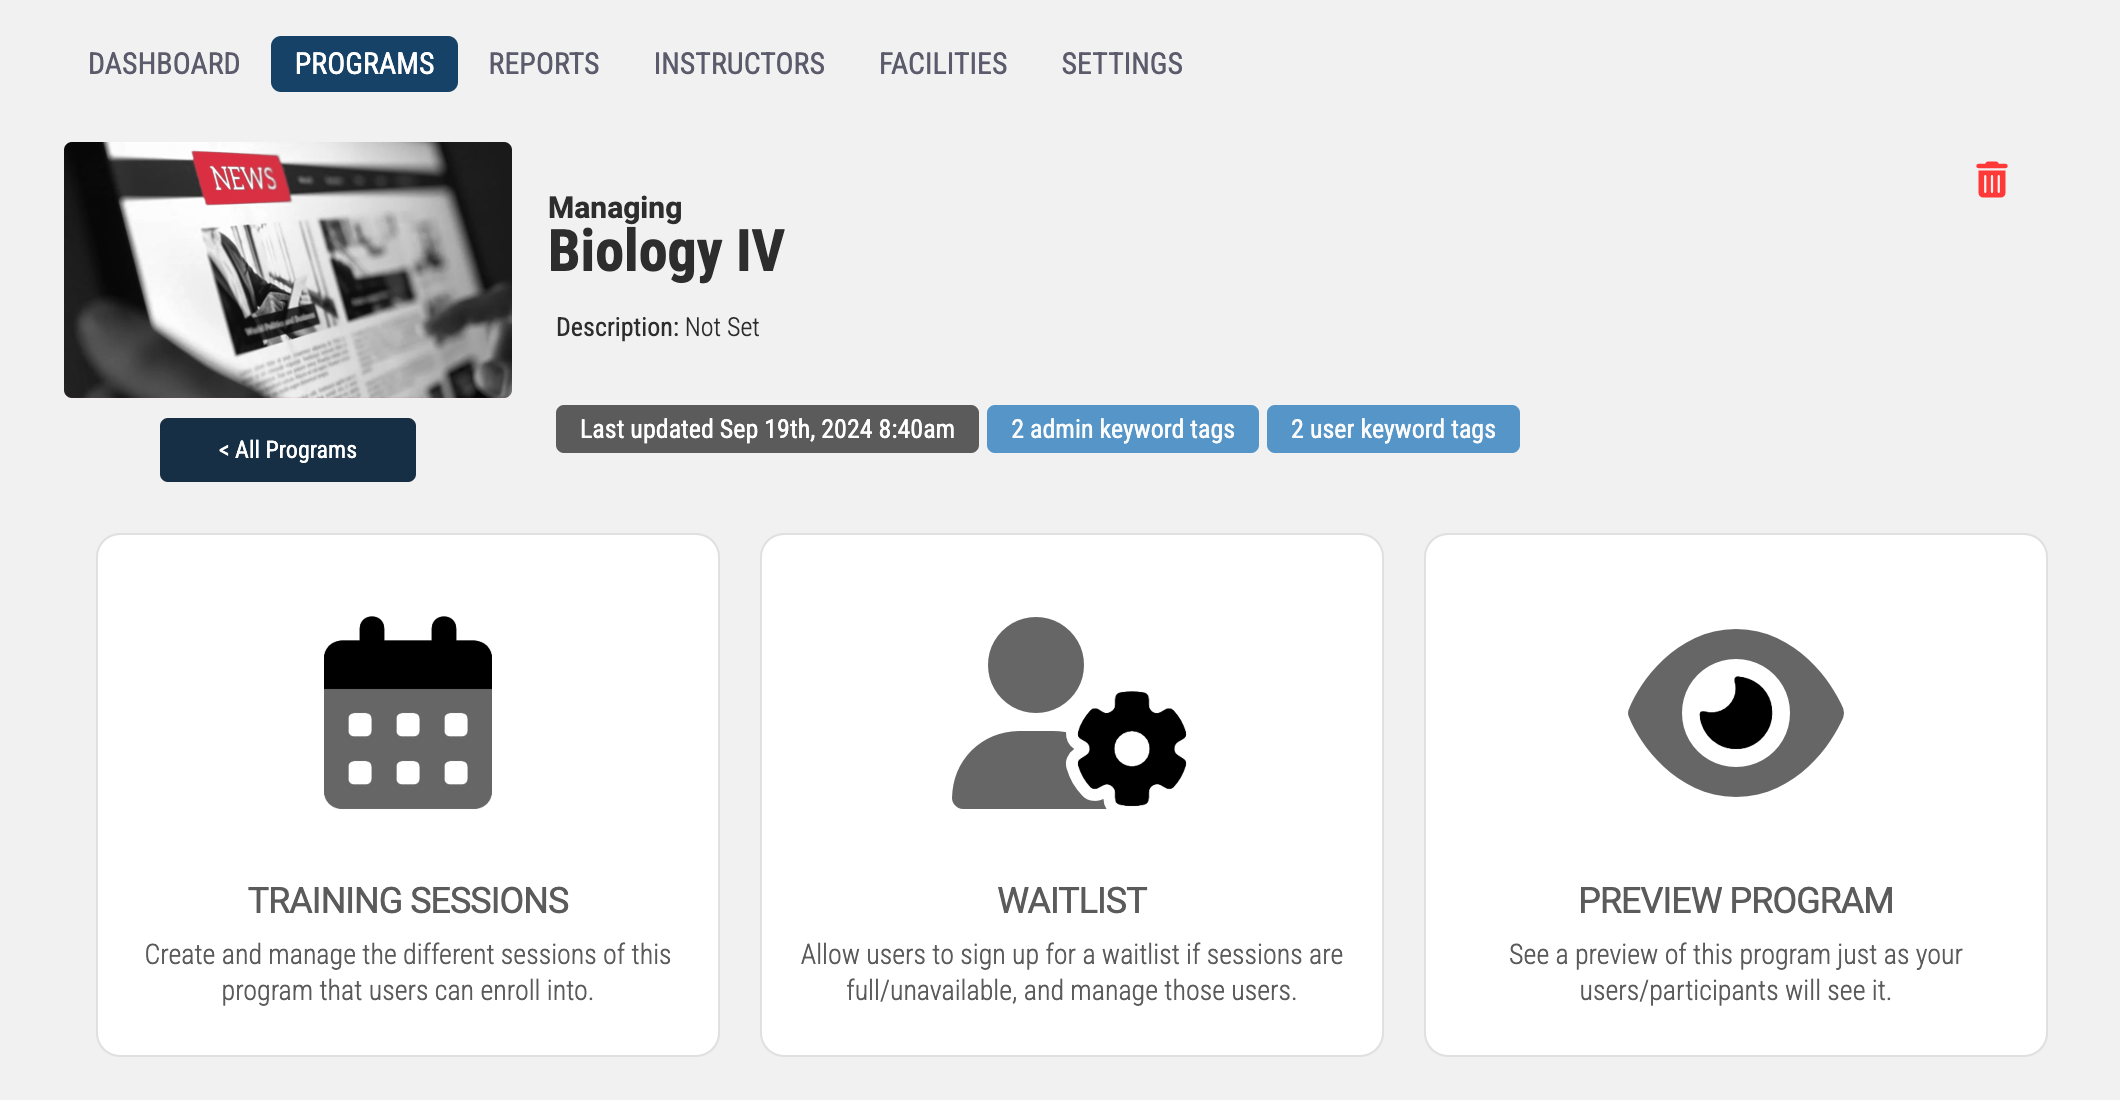
Click the Training Sessions tile, then click the Add a New Session button.
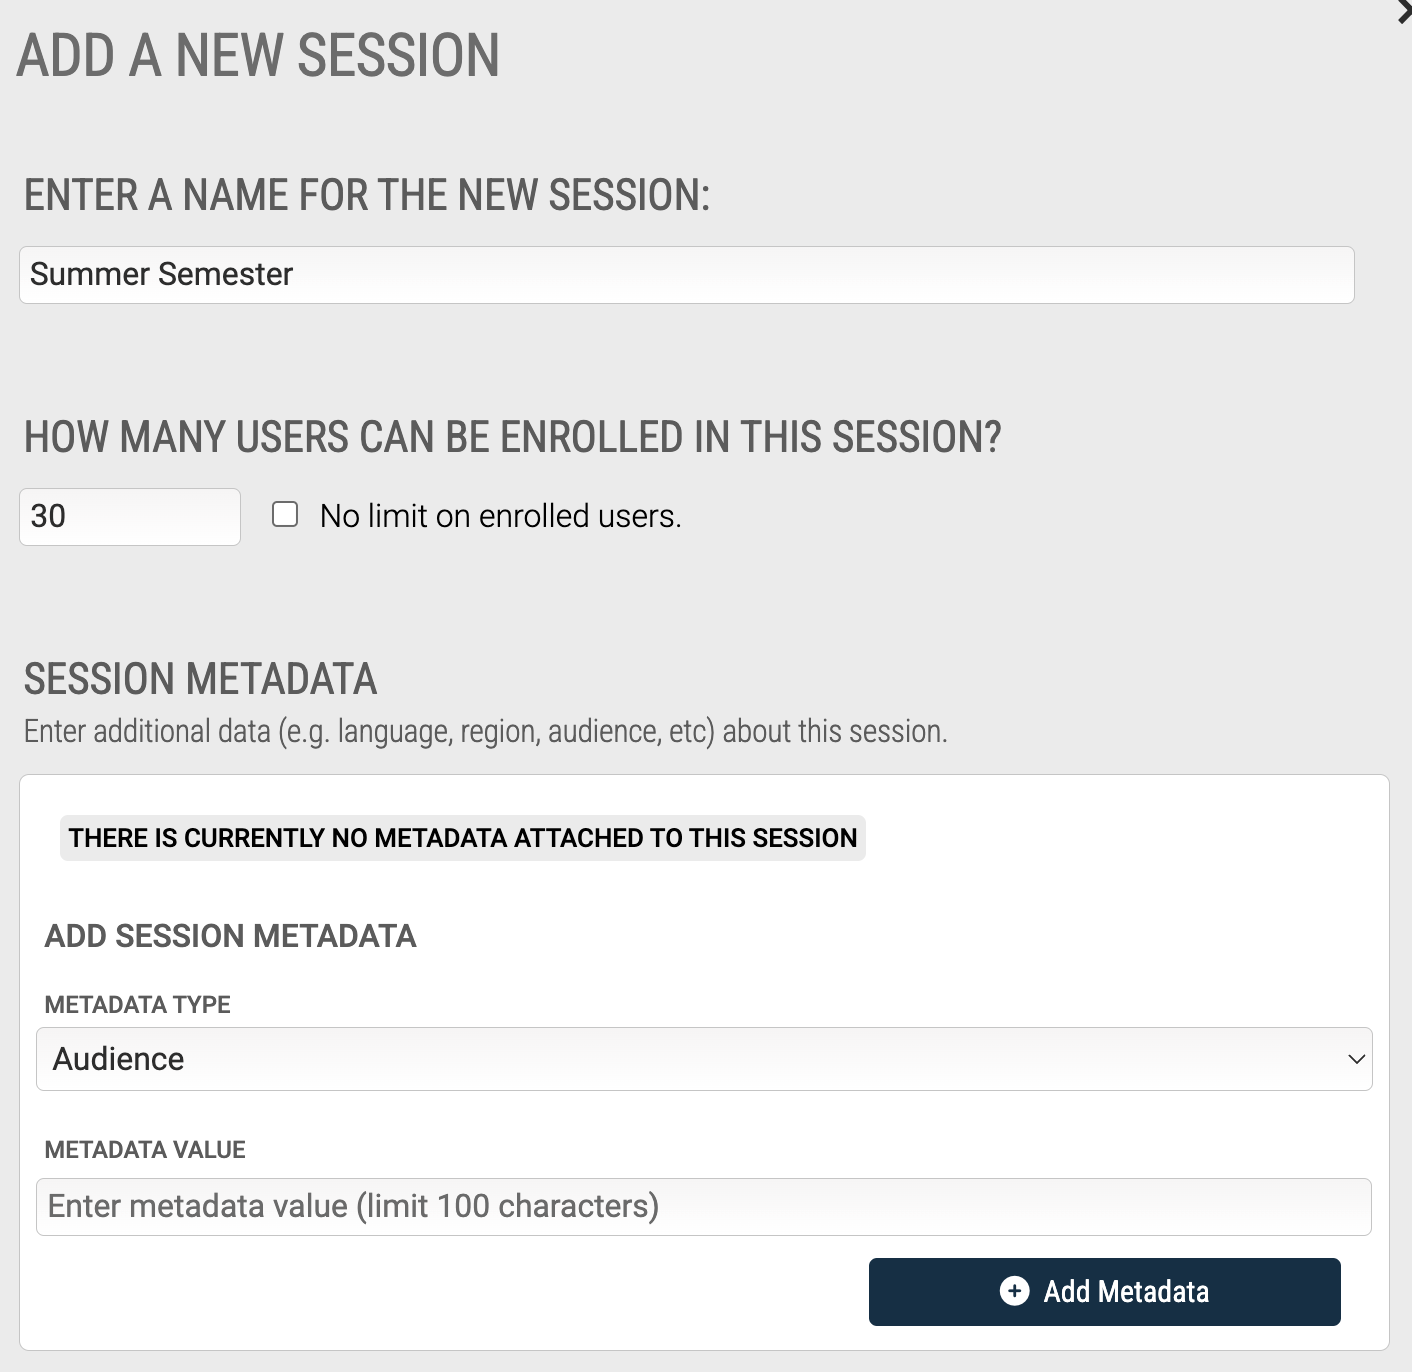
Enter a name (e.g.: Fall Semester), and how many users can enroll into the session. If you do not want to impose a limit, check the corresponding box. Note if you are delivering part or all of this session as virtual/streaming classes, it’s a good idea to limit the number of users to the default of 30 or less for the best experience for everyone.
You can enter multiple sessions. In this example, add a 2nd session (Fall 2021). Once you are done, the listing will show the sessions you have entered.
Add Meeting(s) to a Session (the ‘Schedule’)
Now we can add one or more meetings to a sessions. A meeting is simply a day, time, and location (physical or virtual).
For this example, the Fall 2021 meets every Monday and Tuesday. We will add meetings to do this.
To add meetings, click the Meetings button next to the Fall 2021, then click the Add a New Meeting button.
Here you can choose to add a single meeting, or a series of meetings. For this example, we will be adding a series of meeting for the Fall Semester, so click the Create a Series of Meetings tile.
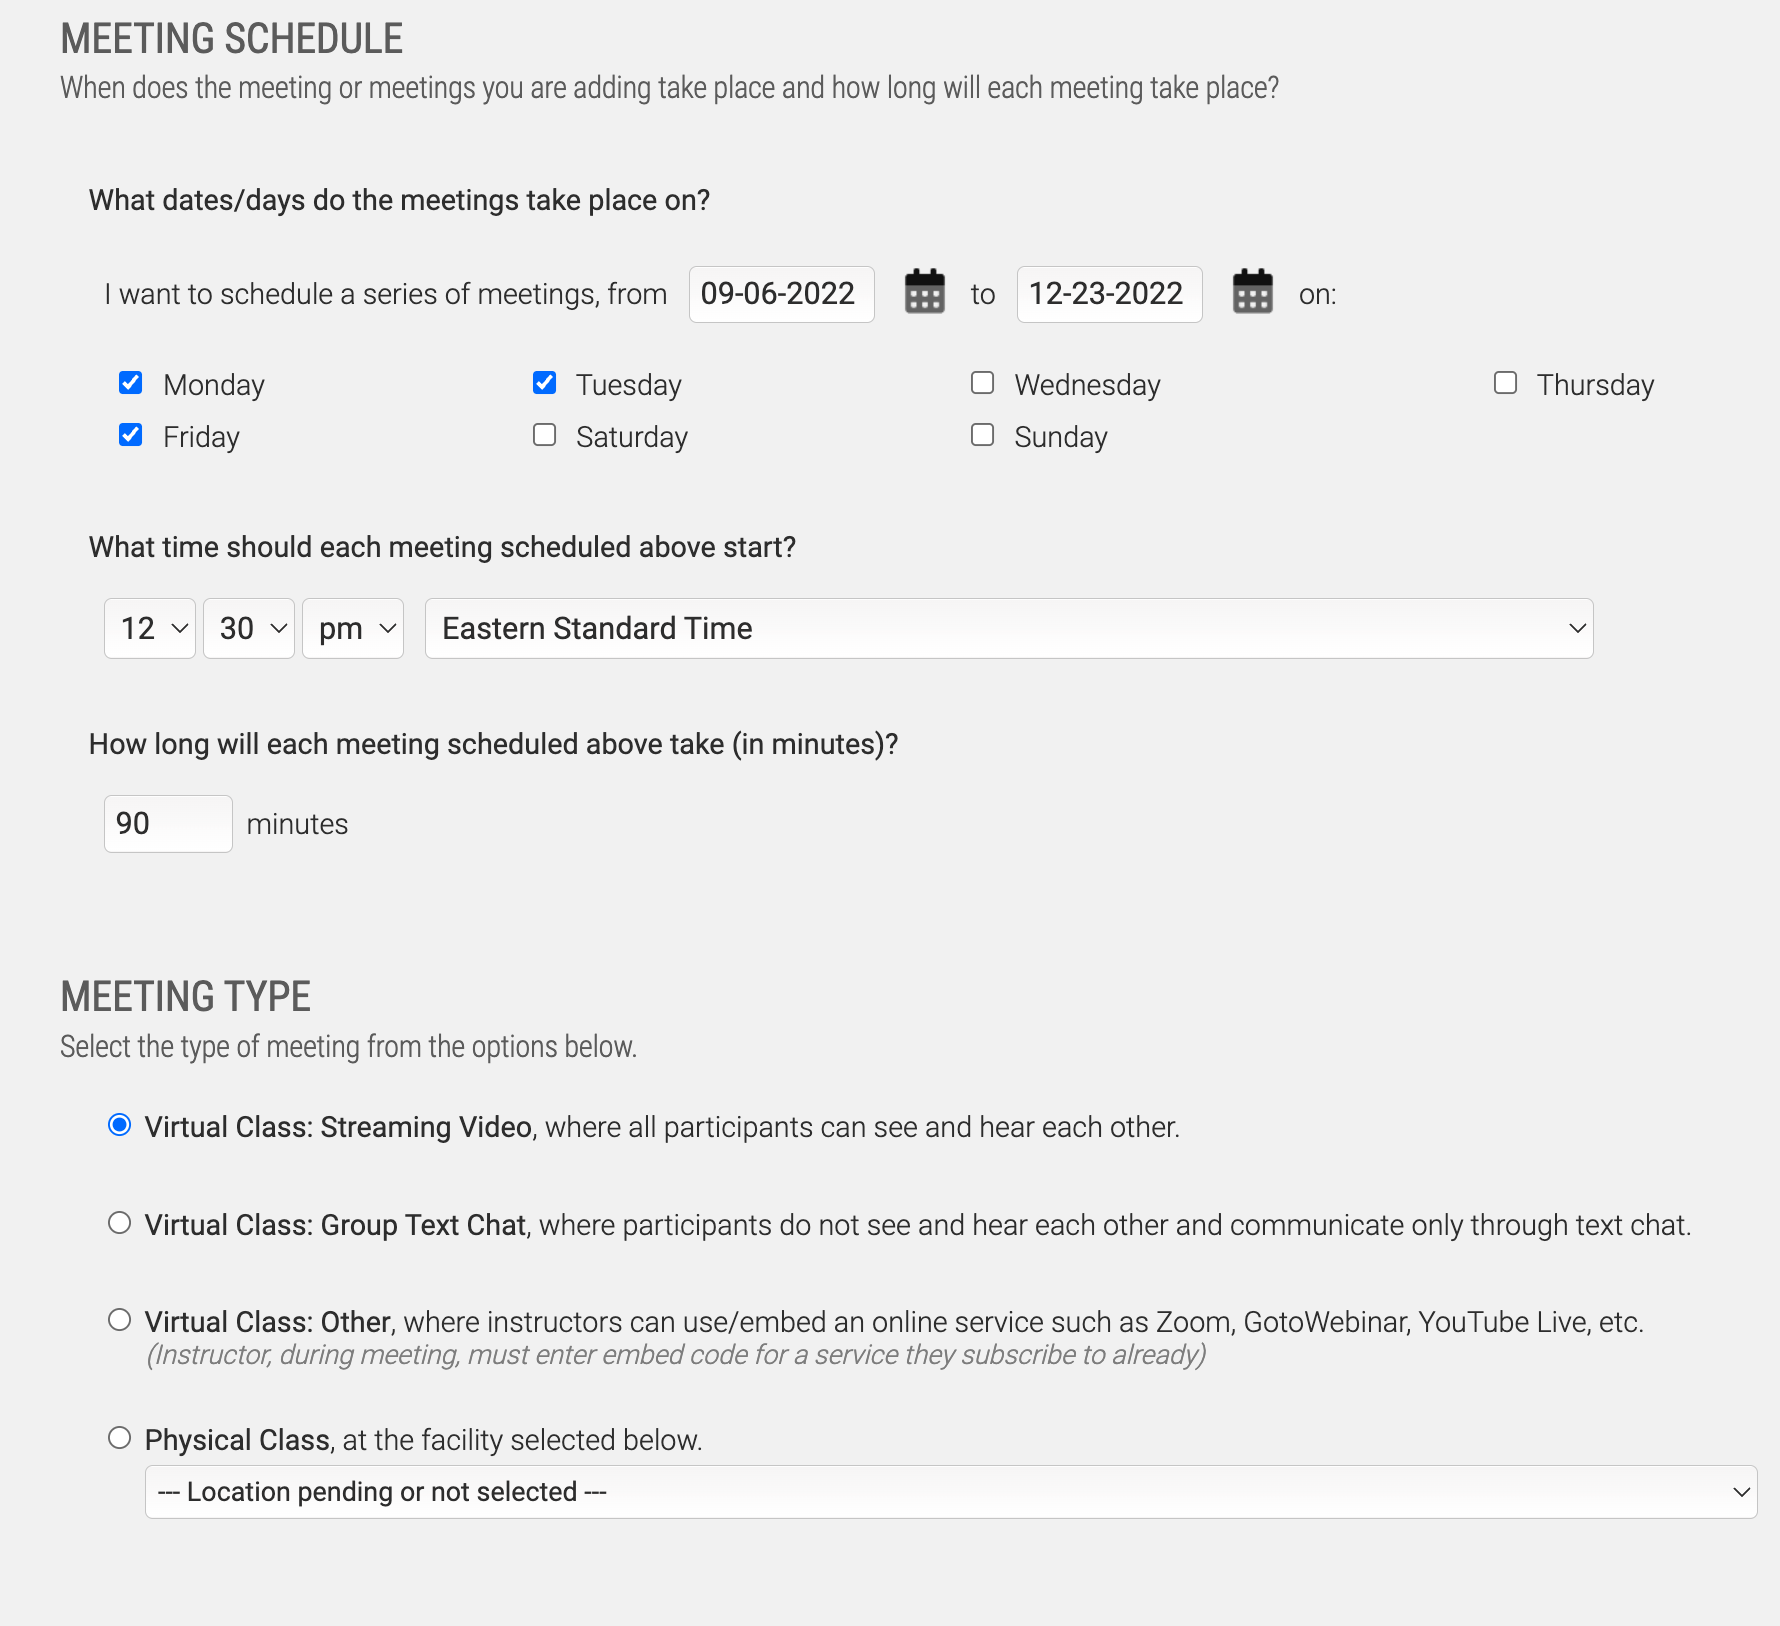
Fill out the form as needed. In this example, we will be setting the schedule so that meetings occur every Monday and Tuesday.
For the Meeting Location, as these will be virtual/streaming, choose Virtual Classroom - Video & Text Chat - which enables video and text chat during the virtual class.
Lastly, choose the instructor. In this case we have only set up a single instructor in the system, so check the box next to their name, then click the Save button.
Once done, a list of every meeting in the session will appear. Since we set up Monday and Tuesday nights across 3 months, the list of meeting for this example will be about 2 dozen dates and times.
Activate Session (Make it Live)
Now we need to make the session available to users so they can enroll. We do this by Activating the session.
Return to the Manage Sessions screen (from the Manage Meetings screen, click the Return To Manage Sessions Button), then click the Activate button next to the Fall Semester session (listed under ‘Pending Sessions’), then click OK.
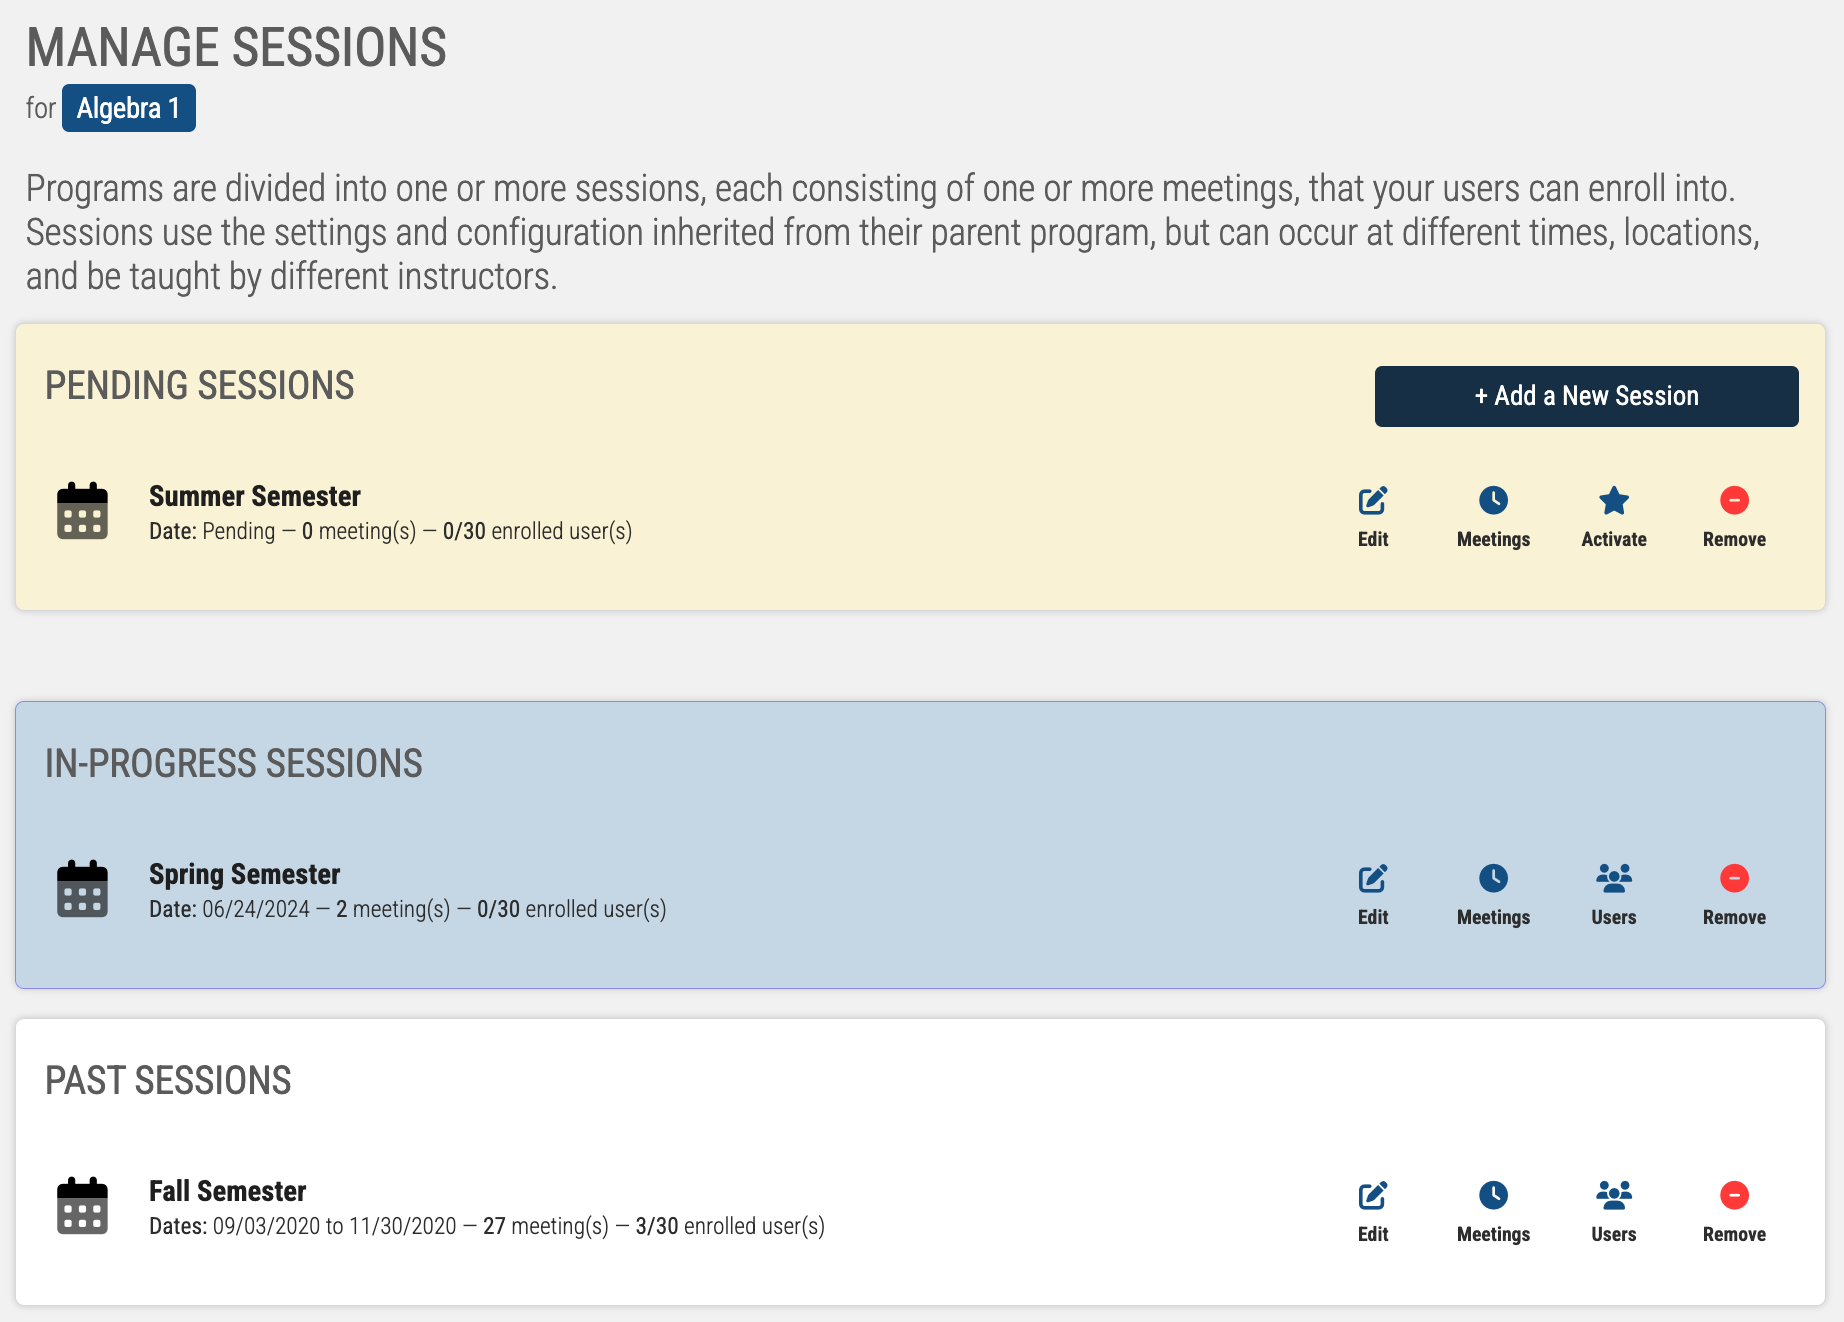
Once the session is active, users can enroll into the session from the Learning Portal.
Preview the ILT Program
To see what you have created, you can use the Preview function. To do so, click the Return to Manage Program button, then click the Preview Program tile.
… this will bring up a user view of the program.
Just about everything on the user side pages are configurable, but for this exercise we will just leave everything at their defaults.
Accessing the ILT Program/Session/Meeting
There are two ‘modes’ of access to an ILT Program - as an instructor, and as a learner/participant/student. The way of access is the same however.
Accessing the ILT Program as a Learner/Participant/Student
Using the Algebra 1 Program as our example, a user will log into their account, click the Live Training Catalog link, then click the View button on the Algebra 1 tile to view the program:
This brings the user to the Algebra 1 Program Overview page. Again, we are using all defaults here, but you can see there is a listing of Upcoming Sessions, which in our case shows the one we set up — the Fall Semester.
Click the View button next to Fall Semester to bring up the schedule.
Information on the Algebra 1 Fall Semester will appear.
On this screen you will see (1) the schedule, (2) the Instructor, (3) the Location and (4) a button to enroll in the session.
At this point, you are not yet enrolled in the session, so click the Enroll in This Session button. This will enroll you, and refresh the screen which will contain some additional information about the Algebra 1 Fall Semester:
If you have them configured, Online Courses, and Additional Materials tabs will appear along the top. Both of these are all configurable when you set up an ILT Program, and we will discuss later in more detail in this documentation, but in our example, these two tabs will not appear unless you have set your default for new Programs to automatically link to specific courses and/or materials.
The Next Meeting will appear along the top, followed by the remaining Upcoming Meetings for the session.
To enter into a meeting, simply click the Start button next to the meeting at the time it is scheduled.
The first time, your browser may request approval to access your microphone and camera - go ahead and approve the access. You will see a screen similar to this:
Each person in attendance will appear in a video tile. In most circumstances, you will want to locate the Instructor video tile and click on their tile to bring them into focus. Each instructor has the phrase (INSTRUCTOR) as a prefix to assist you in locating them if there are a lot of video tiles to go through.
Note the screen is divided into 3 sections. The main area is the video stream. To the right are the people in attendance for the training, and along the bottom is an area where you can send chat messages.
The chat function has a few configurable options, including turning it off entirely for the Training Program, which will be discussed later in this documentation.
For future access, users will be able to access all the Live Training they are enrolled in by going to the My Live Training tab:
Accessing the ILT Program as an Instructor
Similar to users that are not instructors, instructors also access the classes they are teaching from the My Live Training tab. As an Instructor, the Training Program Overview screen has a slightly modified view — in this case, there will be a Sessions You’re Teaching listing.
Click on the View button next to a session you are teaching, and the Session screen will include an additional Attendance tab where you can mark attendance:
When you enter into a meeting for a session you are teaching (click the Start button), you will get an additional control to mute everyone.
This will not prevent them from un-muting at a later time, but it’s a quick way to get everyone muted so you can begin your class.
In this example, we will set up a basic ILT Program, which will consist of 2 live streaming sessions (meaning you and/or an instructor will live-stream to one or more trainees).
First, enter the ILT module by going to the Learning area, then click the Instructor Led Training tile.
Setup Instructors
We will want to set up at least 1 instructor.
Setting up instructors doesn’t need to be done each time - but as this is the first time we are using this area, we are going to need to designate one or more users as eligible instructors.
So, click on the Instructors tile:
Next, click the button to add an instructor:
You will be prompted to enter a few characters of the instructor’s name. The ‘pool’ of potential instructors is based on the users currently in your LMS system.
Once you have located the user you would like to designate, click on their name to add them as an instructor.
In short, these 2 text areas enable to you set up a small bio (shown on the program session page when users are viewing the information regarding the program itself), and a full bio (available when a user navigates to the instructors full bio page).
Once you have set these up, click the Save Changes button.
Create an ILT Training Program
Now that we have an instructor, we can create a training program - the top-most level of a subject/course (e.g.: Algebra 1).
Click the Dashboard tab, then Training Programs tile.
Click the button to add a new ILT Program, then enter a name for the program in the space provided (Algebra 1).
Add Training Session(s) to the Program
Now we can add one or more sessions. A session is a grouping of days/times (e.g.: Fall Session). It is likely that you will initially create your ILT Programs for all of your subjects, but then just continually add new Training Sessions going forward and rarely add new ILT Programs after they are initially set up.
Click the Training Sessions tile, then click the Add a New Session button.
Enter a name (e.g.: Fall Semester), and how many users can enroll into the session. If you do not want to impose a limit, check the corresponding box. Note if you are delivering part or all of this session as virtual/streaming classes, it’s a good idea to limit the number of users to the default of 30 or less for the best experience for everyone.
You can enter multiple sessions. In this example, add a 2nd session (Fall 2021). Once you are done, the listing will show the sessions you have entered.
Add Meeting(s) to a Session (the ‘Schedule’)
Now we can add one or more meetings to a sessions. A meeting is simply a day, time, and location (physical or virtual).
For this example, the Fall 2021 meets every Monday and Tuesday. We will add meetings to do this.
To add meetings, click the Meetings button next to the Fall 2021, then click the Add a New Meeting button.
Here you can choose to add a single meeting, or a series of meetings. For this example, we will be adding a series of meeting for the Fall Semester, so click the Create a Series of Meetings tile.
Fill out the form as needed. In this example, we will be setting the schedule so that meetings occur every Monday and Tuesday.
For the Meeting Location, as these will be virtual/streaming, choose Virtual Classroom - Video & Text Chat - which enables video and text chat during the virtual class.
Lastly, choose the instructor. In this case we have only set up a single instructor in the system, so check the box next to their name, then click the Save button.
Once done, a list of every meeting in the session will appear. Since we set up Monday and Tuesday nights across 3 months, the list of meeting for this example will be about 2 dozen dates and times.
Activate Session (Make it Live)
Now we need to make the session available to users so they can enroll. We do this by Activating the session.
Return to the Manage Sessions screen (from the Manage Meetings screen, click the Return To Manage Sessions Button), then click the Activate button next to the Fall Semester session (listed under ‘Pending Sessions’), then click OK.
Once the session is active, users can enroll into the session from the Learning Portal.
Preview the ILT Program
To see what you have created, you can use the Preview function. To do so, click the Return to Manage Program button, then click the Preview Program tile.
… this will bring up a user view of the program.
Just about everything on the user side pages are configurable, but for this exercise we will just leave everything at their defaults.
Accessing the ILT Program/Session/Meeting
There are two ‘modes’ of access to an ILT Program - as an instructor, and as a learner/participant/student. The way of access is the same however.
Accessing the ILT Program as a Learner/Participant/Student
Using the Algebra 1 Program as our example, a user will log into their account, click the Live Training Catalog link, then click the View button on the Algebra 1 tile to view the program:
This brings the user to the Algebra 1 Program Overview page. Again, we are using all defaults here, but you can see there is a listing of Upcoming Sessions, which in our case shows the one we set up — the Fall Semester.
Click the View button next to Fall Semester to bring up the schedule.
Information on the Algebra 1 Fall Semester will appear.
On this screen you will see (1) the schedule, (2) the Instructor, (3) the Location and (4) a button to enroll in the session.
At this point, you are not yet enrolled in the session, so click the Enroll in This Session button. This will enroll you, and refresh the screen which will contain some additional information about the Algebra 1 Fall Semester:
If you have them configured, Online Courses, and Additional Materials tabs will appear along the top. Both of these are all configurable when you set up an ILT Program, and we will discuss later in more detail in this documentation, but in our example, these two tabs will not appear unless you have set your default for new Programs to automatically link to specific courses and/or materials.
The Next Meeting will appear along the top, followed by the remaining Upcoming Meetings for the session.
To enter into a meeting, simply click the Start button next to the meeting at the time it is scheduled.
The first time, your browser may request approval to access your microphone and camera - go ahead and approve the access. You will see a screen similar to this:
Each person in attendance will appear in a video tile. In most circumstances, you will want to locate the Instructor video tile and click on their tile to bring them into focus. Each instructor has the phrase (INSTRUCTOR) as a prefix to assist you in locating them if there are a lot of video tiles to go through.
Note the screen is divided into 3 sections. The main area is the video stream. To the right are the people in attendance for the training, and along the bottom is an area where you can send chat messages.
The chat function has a few configurable options, including turning it off entirely for the Training Program, which will be discussed later in this documentation.
For future access, users will be able to access all the Live Training they are enrolled in by going to the My Live Training tab:
Accessing the ILT Program as an Instructor
Similar to users that are not instructors, instructors also access the classes they are teaching from the My Live Training tab. As an Instructor, the Training Program Overview screen has a slightly modified view — in this case, there will be a Sessions You’re Teaching listing.
Click on the View button next to a session you are teaching, and the Session screen will include an additional Attendance tab where you can mark attendance:
When you enter into a meeting for a session you are teaching (click the Start button), you will get an additional control to mute everyone.
This will not prevent them from un-muting at a later time, but it’s a quick way to get everyone muted so you can begin your class.