Selection Properties
The Selection Properties window allows you to transform, position, and size the currently selected object, as well as assign a unique ID and CSS Classes to the object.
Note: Unlike the Effects and Click Events tabs which support multiple-selected objects, the items under the Selection Properties tab only apply to a single selected object. If multiple objects are selected, the options in the Selection Settings will only apply to the last object that was selected during multi-select.
Flip Selection
Flips (mirrors) the selected object either horizontally or vertically.
Rotate Selection
Rotate the select object either 90 degrees clockwise or 90 degrees counter clockwise. Rotated objects can be rotated to the 90°, 180°, 270°, or 360°.
Note: Versions of Internet Explorer older than version 9, and also some older web browsers do not rotate objects at the same point of origin as modern browsers, causing their positioning to be out of place.
Center Selection
Center the selected object either horizontally or vertically on the slide.
Fill Slide
Resize the selected object to fill the entire slide (resizing it to 750px wide by 450px wide).
Remove Selection
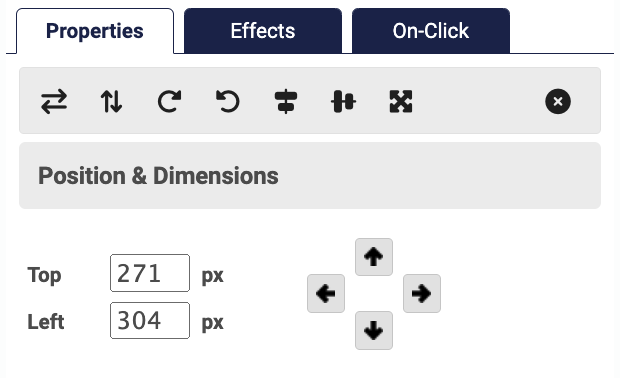
Remove the selected object from the slide.Positions & Dimensions. Set the exact position (distance from top and distance from left in pixels) and dimensions (width and height in pixels) for the selected object. To set an object’s position, use the input fields for top and left to manually enter a value, or use the nudge buttons to nudge and object 1 pixel in any direction. To set an object’s dimensions, use the input fields for width and height to manually enter a value, or use the nudge buttons to increase/decrease the width or height by 1 pixel.
Object ID
Assign an ID to the selected object. The Object ID should be unique, start with a letter, and contain only letters, numbers, underscores, and hyphens (note to web developers: this aligns to the DOM ID). Once an object has an ID, it can be used with both the Extra CSS and JavaScript sections of the module settings to customize the style and behavior of the object. For more information on what you can do with the Object ID consult the Appendix A: SlidePoint Module Extra CSS and Appendix B: SlidePoint Module JavaScript sections of this manual.
CSS Class(es)
Assign additional CSS Classes to the selected object. CSS Classes should start with a letter and contain only letters, numbers, underscores, and hyphens. You can specify multiple CSS Classes for a single object by separating the classes by a comma (i.e. “class1, class2, class3”). Once an object has a CSS, it can be used with both the Extra CSS and JavaScript sections of the module settings to customize the style and behavior of the object. For more information on what you can do with the Object ID consult the Appendix A: SlidePoint Module Extra CSS and Appendix B: SlidePoint Module JavaScript sections of this manual.
The Selection Properties window allows you to transform, position, and size the currently selected object, as well as assign a unique ID and CSS Classes to the object.
Note: Unlike the Effects and Click Events tabs which support multiple-selected objects, the items under the Selection Properties tab only apply to a single selected object. If multiple objects are selected, the options in the Selection Settings will only apply to the last object that was selected during multi-select.
Flip Selection
Flips (mirrors) the selected object either horizontally or vertically.
Rotate Selection
Rotate the select object either 90 degrees clockwise or 90 degrees counter clockwise. Rotated objects can be rotated to the 90°, 180°, 270°, or 360°.
Note: Versions of Internet Explorer older than version 9, and also some older web browsers do not rotate objects at the same point of origin as modern browsers, causing their positioning to be out of place.
Center Selection
Center the selected object either horizontally or vertically on the slide.
Fill Slide
Resize the selected object to fill the entire slide (resizing it to 750px wide by 450px wide).
Remove Selection
Remove the selected object from the slide.Positions & Dimensions. Set the exact position (distance from top and distance from left in pixels) and dimensions (width and height in pixels) for the selected object. To set an object’s position, use the input fields for top and left to manually enter a value, or use the nudge buttons to nudge and object 1 pixel in any direction. To set an object’s dimensions, use the input fields for width and height to manually enter a value, or use the nudge buttons to increase/decrease the width or height by 1 pixel.
Object ID
Assign an ID to the selected object. The Object ID should be unique, start with a letter, and contain only letters, numbers, underscores, and hyphens (note to web developers: this aligns to the DOM ID). Once an object has an ID, it can be used with both the Extra CSS and JavaScript sections of the module settings to customize the style and behavior of the object. For more information on what you can do with the Object ID consult the Appendix A: SlidePoint Module Extra CSS and Appendix B: SlidePoint Module JavaScript sections of this manual.
CSS Class(es)
Assign additional CSS Classes to the selected object. CSS Classes should start with a letter and contain only letters, numbers, underscores, and hyphens. You can specify multiple CSS Classes for a single object by separating the classes by a comma (i.e. “class1, class2, class3”). Once an object has a CSS, it can be used with both the Extra CSS and JavaScript sections of the module settings to customize the style and behavior of the object. For more information on what you can do with the Object ID consult the Appendix A: SlidePoint Module Extra CSS and Appendix B: SlidePoint Module JavaScript sections of this manual.