
Learn how to create subscriptions to your online training products.
There are several ways that you are able to sell online courses via subscriptions, but overall, you can use the ‘Other Products’ (found in the ShoppingCart) to create these. You have the ability to offer subscriptions to individual courses, or to the system — enabling your customers access to multiple courses for a certain amount of time you define.
Additionally, you don’t have to create the same course with different lengths of time.
You can create multiple ‘Other Products’ and use the product triggers to enroll or extend the user into the same course for a certain amount of days.
This article takes you through all the steps to set up the ability to sell online courses via subscriptions for your courses
Through the use of Authorize.net and features introduced with 10.3, the Axis LMS offers you the opportunity to sell your Online Courses in a whole new way.
Using (what we refer to as) Subscription Based selling, you can create a steady source of income that you can count on each month. One of the best aspects of this is that is can be implemented without affecting existing users. Depending on the aspects you choose to implement, an an entire ecosystem can be created within your LMS just for subscribers.
To reach this point, there will be a small amount of setup and calculations required that falls on to you.
While this article can’t help with the calculations (should it be cheaper to buy required courses, or just get a subscription?), the article can act as an excellent guide to the setup.
Sell Online Courses via Subscriptions – Steps
There are four broad points in the setup process:
- Set up the Shopping Cart
- Create a Learning Portal Page for Subscribers
- Determine which Courses come with the subscription
- Create shopping cart products [1 month, 3 month, 6 month, etc.]
Step One: Setting Up The Shopping Cart
Already know how to sell online courses through Axis LMS? Skip ahead to Step Two.
New to LMS transactions? Here’s a quick run through.
Start at..
E-Commerce > Shopping Cart > Manage User Store Settings > Simulated Checkout: Authorize.net OR PayPal [select one]. Fill out the rest of the Payment Gateway information (API Login & Transaction Key OR PayPal Business Email Address).
You will need to have a merchant account with one of these Payment Gateways to begin selling through Axis. To sign up for an Authorize.NET account see here.
There are many other settings available on this page (Failed Order pages, Terms and Conditions, Notification Emails, etc.), but for the Shopping Cart to function, the only required fields are under the Payment Gateway section.
It is highly recommended that you thoroughly test that the cart is functioning before introducing it to a paying audience.
Step Two: Subscription User Learning Portal
If your business model is composed solely of selling subscriptions, this step may be able to be skipped entirely. This step is to create at least one page that only Subscription based users will see.
Unless your only users will be subscribers, it is highly suggested that a new page group is created just for subscribers. Page groups can be created by following along with this article. For this article’s purposes, we’ve created a Page Group (and corresponding User group) named “Subscribers.”

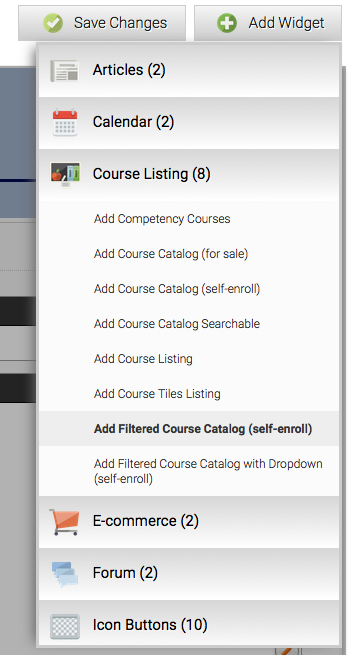
While designing the Learning Portal [System > Site Design > Learning Portal Website], make sure that there are certain widgets available to your Subscribers. The most important of which is a Course Listing widget which allows your subscribers to freely enroll into their different courses.
Depending on your business model, a highly suggested widget to add is the Course Listing: Add Filtered Course Catalog (self-enroll). This widget allows you to apply filters, showing only courses that Subscribers should be able to freely enroll into (covered more in Step Three).
Any other widgets you choose to add are purely optional. Below are a few ideas for different business models:
- A navigation strip [very common]
- Create articles targeted towards subscribers
- Give subscribers access to a resource library
- Upsell courses not included with subscriptions.
Whichever widgets you may decide to use, the most important widget is a self-enroll Course Listing; this gives Subscribers the ability to enroll into courses included in their subscription
Step Three: What’s Included in the Subscription?
Are you only selling subscriptions, OR is every course is included with a subscription? This step can be completely ignored.
While setting up subscriptions as an additional source of revenue, this step is where an admin begins to distinguish the difference between subscription courses, and the rest of their LMS.
To identify what courses should be available to subscribers, you will need to mark it with a unique label. [Learning > Online Courses > Manage Courses > Manage > Settings > Description / Course Label]. For sake of simplicity, this article used the label “SUBSCRIBE”.

After marking several courses with this label, it’s time to backtrack slightly and go into the Filtered Course Listing widget created in Step Two. [System > Site Design > Learning Portal Website Designer > Edit {page} > Edit {Widget}]. With the edit panel open, type the Label one last time into the Filter.

Course not appearing in widget? Check these:
- Course is NOT for sale
[Learning > Online Courses > Manage > E-Commerce] OR change Course Listing to display both
[System > Site Design > Learning Portal Website Designer> Edit {Page} > Edit{Widget}] - The LABEL field matches the Widget filter
[Learning > Online Courses > Manage > Settings] - Course is set to Display in Course Catalog
[Learning > Courses > Manage > Settings]
Step Four: Selling Different Subscription Durations
With the majority of the Subscribers’ UI set up, and the backend settings in place, it’s time begin selling periods of time for subscribers to purchase.
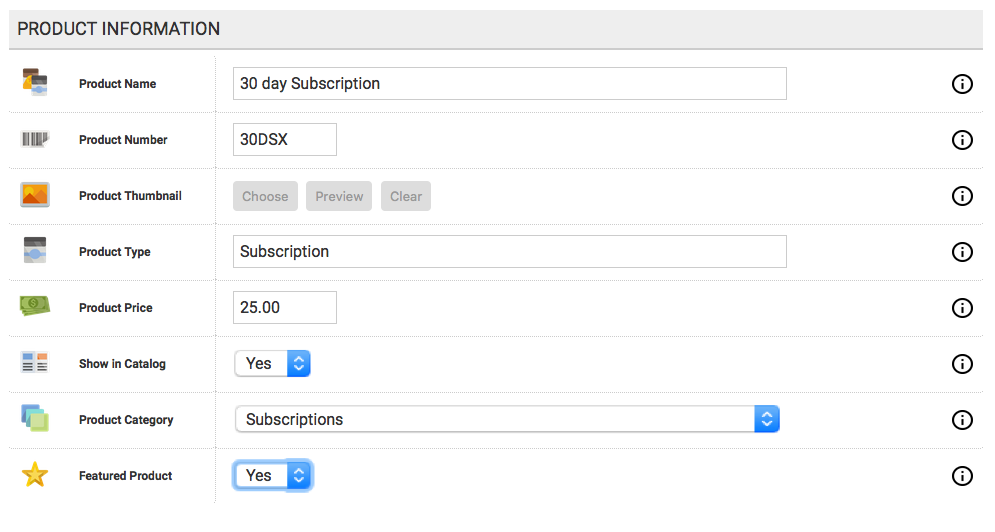
After opening up the Shopping Cart, you’ll want to create an “Other Product” [E-Commerce > Shopping Cart > Manage Other Products > Add a New Product]. For this article, a 30 day subscription is being created; this can be followed infinitely to create different lengths of time (one year, six months, etc.).
A majority of the Product Information area is up to your discretion; below is only a sample – it is recommended to give the product an intelligent name, as it is user-facing.
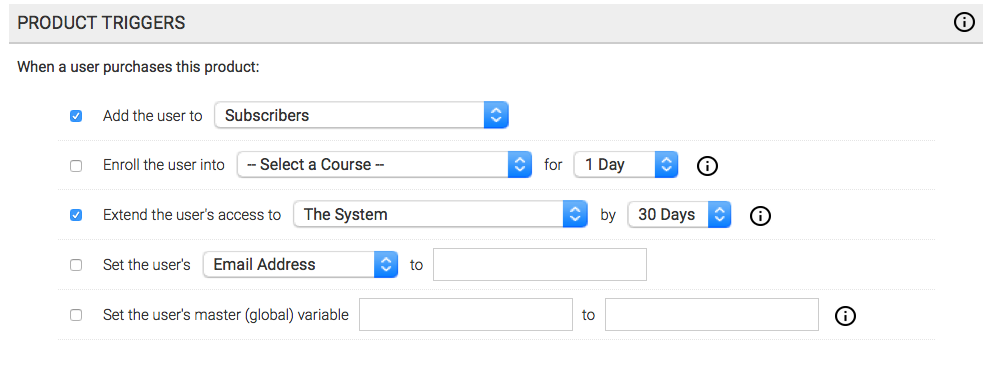
The most important aspects of this product are the Product Triggers. All subscriptions should extend a user’s access in the system by a certain number of days; because this is a 30 day subscription, this product extends access for 30 days. If you’re using Page groups as recommended in Step Two, these Product Triggers should also place purchasers into the associated user group [“Subscribers” for this article].
After you’ve wrapped up each of these steps, it is recommended to perform one last thorough test before advertising the subscription.
So those are the basic steps to sell online courses via subscriptions in Axis LMS.
