Integrating OneLogin SSO with Axis LMS
If you use OneLogin as your SAML identity provider (IdP), you can use the information in this document to set up SAML authentication for your Axis LMS.
These steps assume that you have permissions for modifying your organization’s OneLogin portal.
Note: These steps reflect a third-party application and are subject to change without our knowledge. However, even if the steps described here do not fully match the screens you see in your IdP account, using these steps along with the IdP’s documentation should still enable you to configure the integration.
Step One: Begin Adding The Integration In Axis LMS
- While signed in to Axis LMS as an administrator, go to System > Integration > Single Sign-On (SSO) > SAML Sign-In
- Click the + Add An Integration button
- Select OneLogin from the list of SAML Identity provider.
- Keep this screen/tab open for now as we will refer to it later.
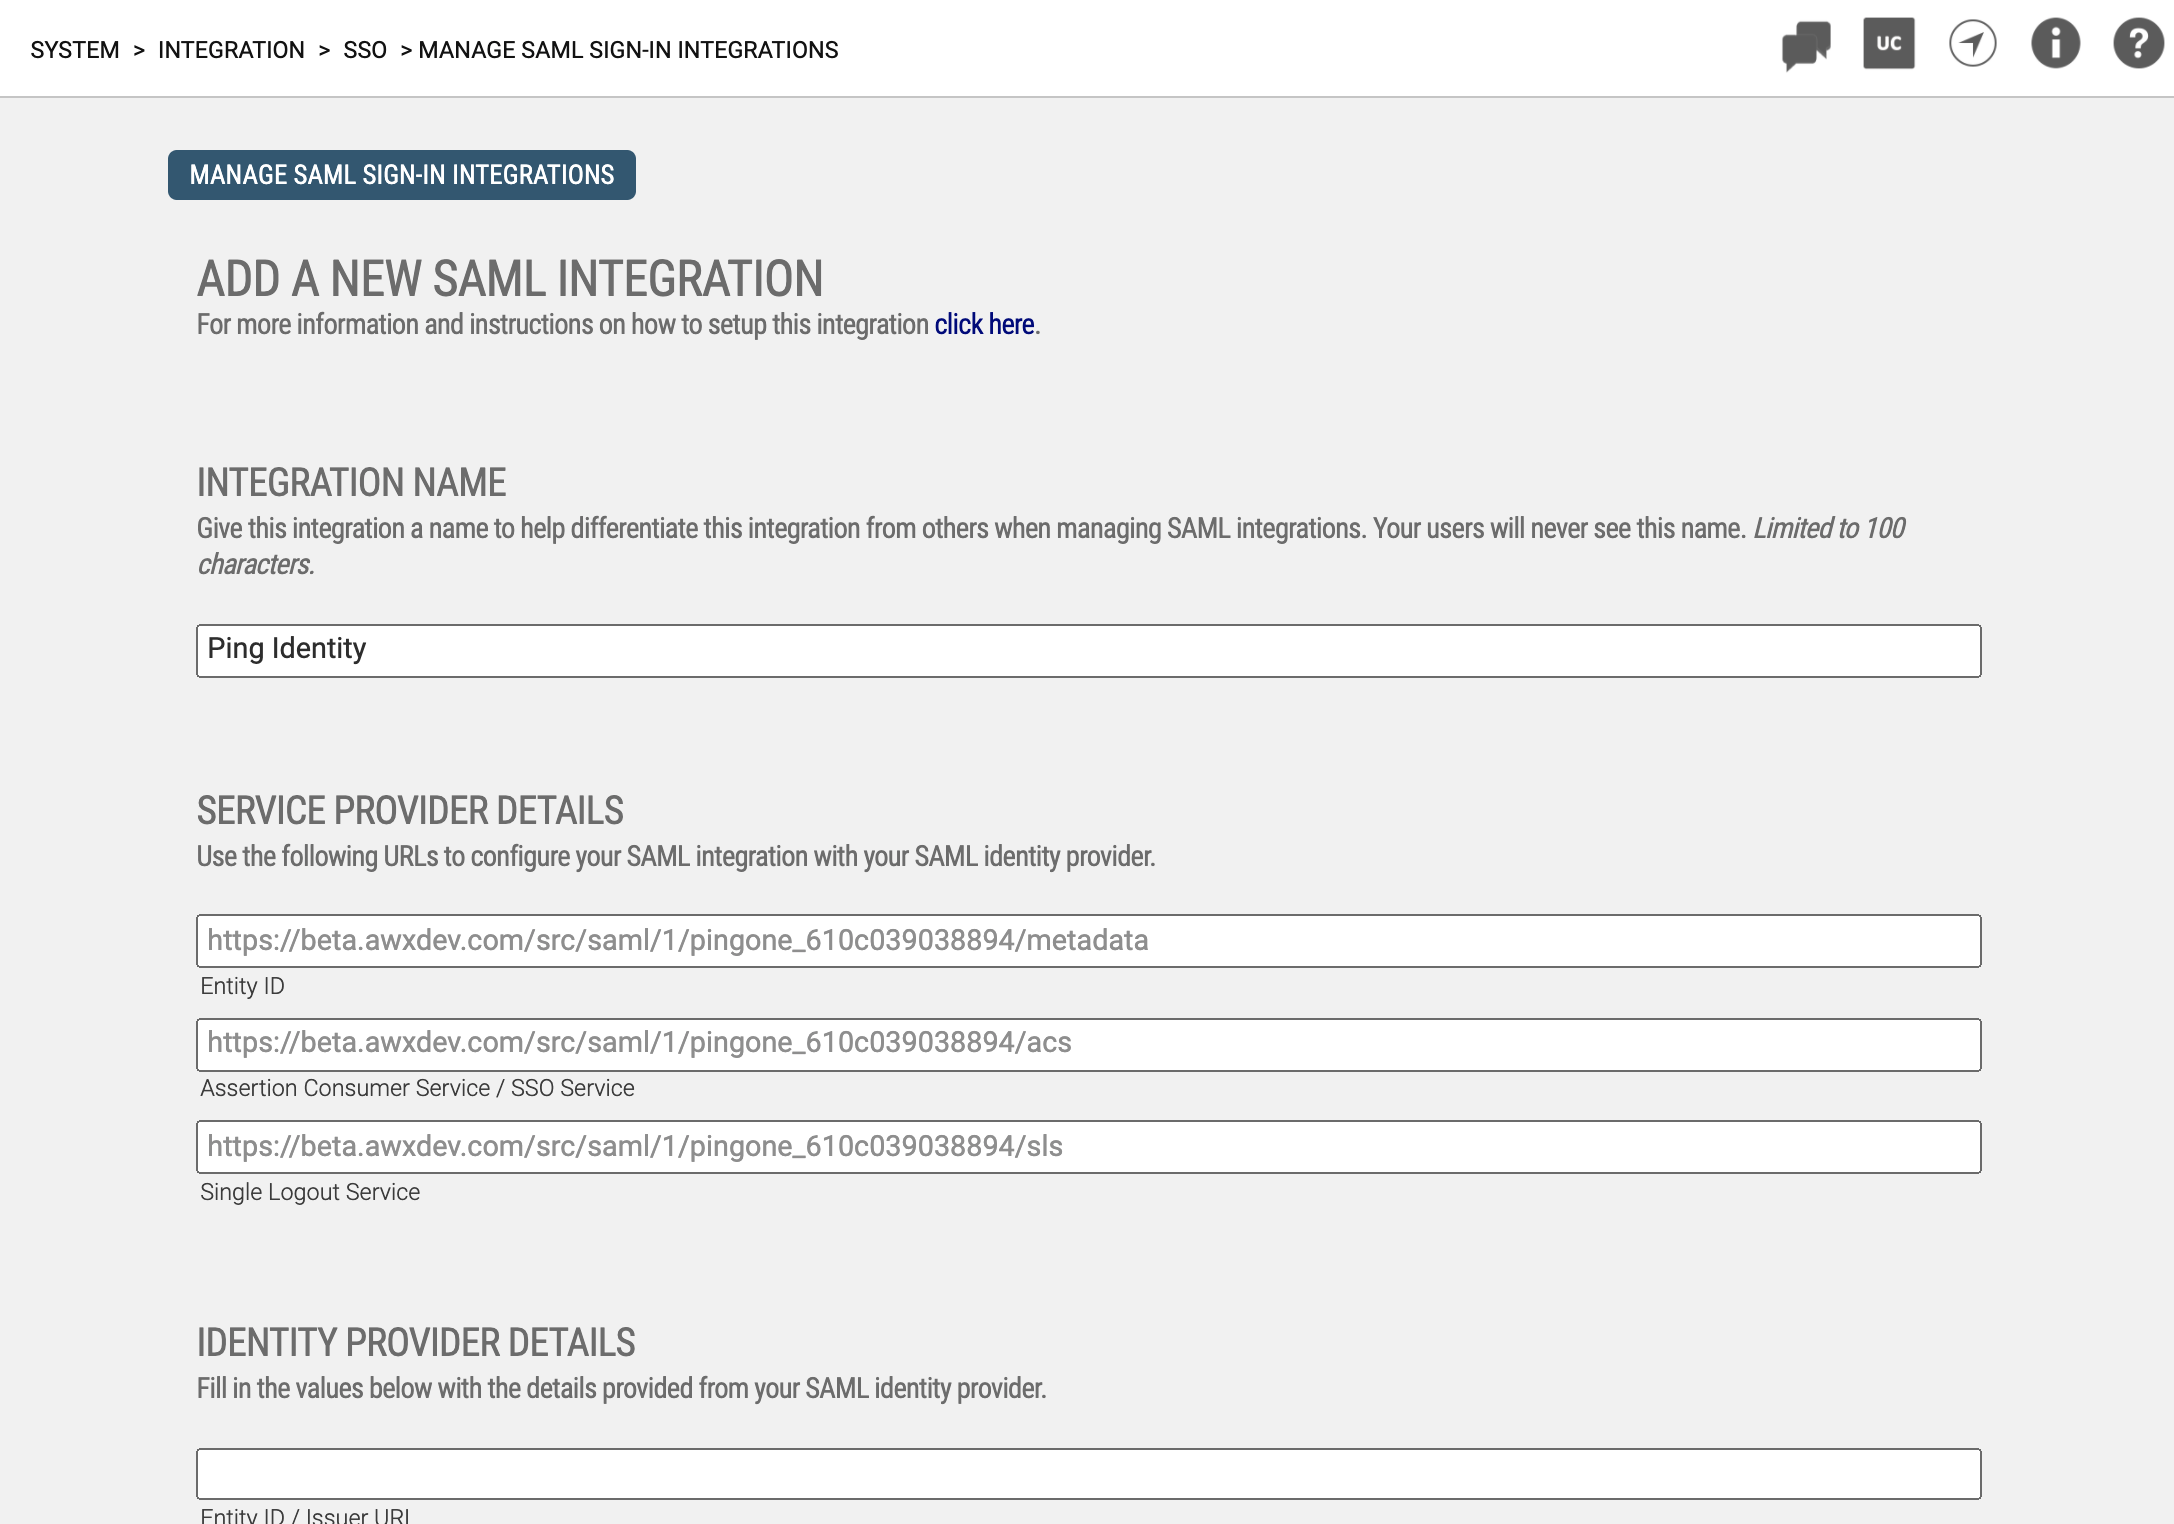
- Figure 1: Add A New Integration Screen in Axis LMS
Step Two: Adding Axis LMS To Your OneLogin Applications
- In a new tab/window, access OneLogin.
- Go to Applications > Add App.
- Search for SAML Test Connector.
- Select the SAML Test Connector (Advanced) app.
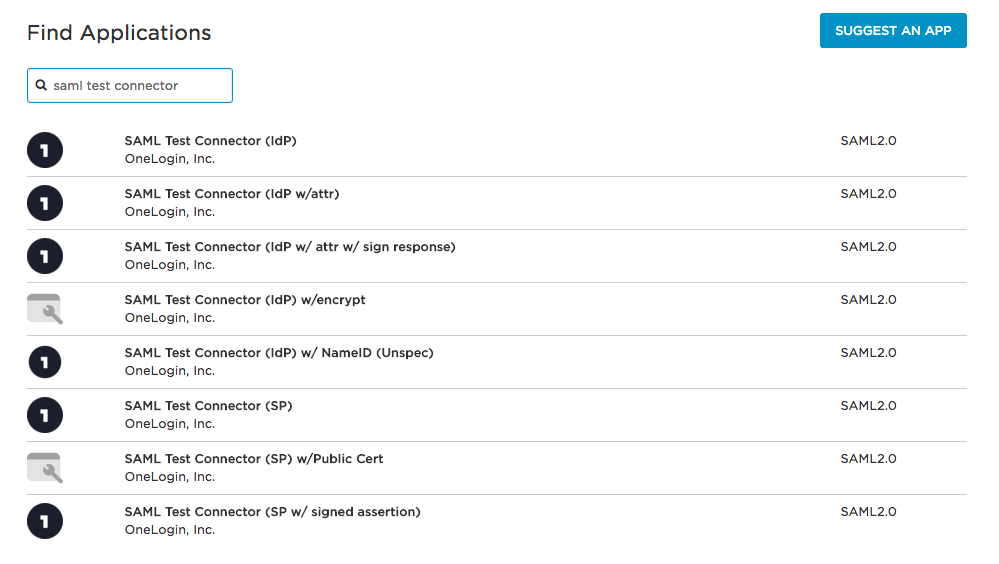
- Figure 2: Add A New Integration Screen in Axis LMS
- Edit the Display Name, entering Axis LMS.
- Accept other default values for now and click Save.
- Keep this screen/tab open for now as we will refer to it later.
Step Three: Add Identity Provider Details To Axis LMS
In this step, you'll provide Axis LMS with the SAML Identity provider values it needs to communicate with OneLogin.
- In the OneLogin app connector UI, select the SSO tab.
- Copy values from the SSO tab and paste them into the Identity Provider Details section of Axis LMS, as shown below.
| Copy SSO Tab Field Value | to | Axis LMS Field Value |
|---|---|---|
| Issuer URL | to | Entity ID / Issuer URL |
| SAML 2.0 Endpoint (HTTP) | to | SAML 2.0 Endpoint / SSO URL |
| SLO Endpoint (HTTP) | to | SLO Endpoint / Logout URL |
| X.509 Certificate > View Details | to | X.509 Certificate |
After copying values from the SSO tab into the Identity Provider Details section of Axis LMS, it should look something like this:
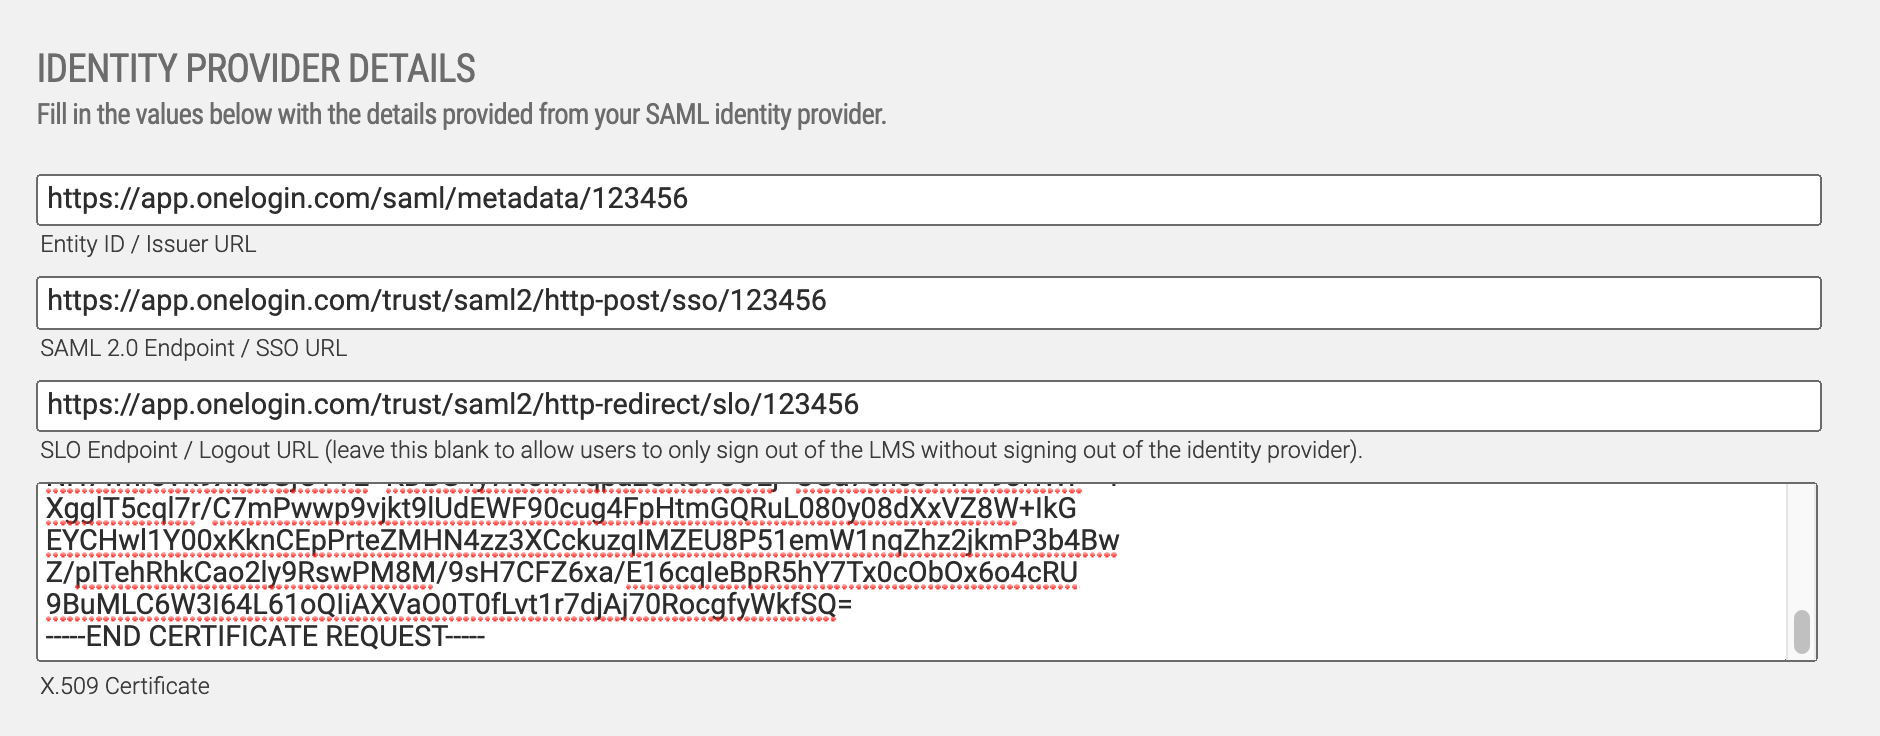
- Figure 3: Add A New Integration Screen in Axis LMS
Step Four: Add Service Provider Details To OneLogin
In this step, we’ll define the service provider values that OneLogin will need to identify your app.
- On the Add A New Integration screen in Axis LMS, go to the Service Provider Details section.
- In the OneLogin app connector UI, select the Configuration tab.
- Copy values from Axis LMS into the Configuration tab fields as shown below.
Copy Axis LMS Field Value to OneLogin Configuration Tab Field Entity ID to Audience Assertion Consumer Service / SSO Service to ACS (Consumer) URL *and* Recipient Single Logout Service to Single Logout URL - You can leave RelayState blank.
- Set ACS (Consumer) URL Validator to .*.
- Click Save.
Step Five: Defining User Attributes
In this step, we’ll define the information about the user (id, email address, first name, last name) that need to be passed to Axis LMS.
- In the OneLogin app connector UI, select the Parameters tab.
- Click the plus icon in the upper right corner of the parameter listing.
- Under Field Name enter "uuid" (without quotations), check the box that reads Include in SAML assertion, then click Save.
- In the Value dropdown, select UUID and then click Save.
- Repeat this sequence three more times, using the fields/values below.
| Field | to | Value |
|---|---|---|
| emailAddress | to | |
| firstName | to | First Name |
| lastName | to | Last Name |
- Note: Even though OneLogin may provide additional user data that can be passed as parameters, only the paramters listed above are compatible with Axis LMS; all other values will be ignored.
Step Six: Finishing Up & Testing
At this point you've completed all the necessary steps to configure the Axis LMS application in OneLogin.
In Axis LMS, on the Add A New Integration screen, finish configuring the User Login settings and then click Save to save the integration in Axis LMS.
To test your new integration, you'll need to give users access to your new application in OneLogin before using the newly generated Axis LMS login link for this integration. For more information on granting users access to your application via OneLogin, please refer to the IdP's documentation.